

Full Unity 2D Recreation Tutorial 2019 – Particle Results CPU and GPU
Particle results are a particular sort of method used to show many objects/sprites in an environment friendly method to create numerous results. The particle system was developed to be a extra environment friendly means of rendering a number of photos shortly to create results that the conventional rendering strategies wouldn’t be capable to do with out an enormous drain on computational energy. Particle results by default are run within the CPU and never within the GPU(as I had thought) nonetheless Unity now has the power to make use of the GPU with particle results which we’ll look into later.
Full Unity 2D Recreation Tutorial 2019 – Particle Results System
With a purpose to use particle results you will need to first add a particle impact system. We shall be including one to our bullets so every of our bullets can emit a cool impact when it’s travelling by means of area. Open up the bullet prefab by double clicking it within the mission window. With the basis object chosen(BulletObject) proper click on and add impact > particle system. As quickly as you add the particle system you need to see the impact play within the scene view.
Full Unity 2D Recreation Tutorial 2019 – Particle Results What does this button do?
 Earlier than we begin I will provide you with a fast overview of the totally different choices (later I’ll have full tutorial on Particle results which I’ll hyperlink to right here).
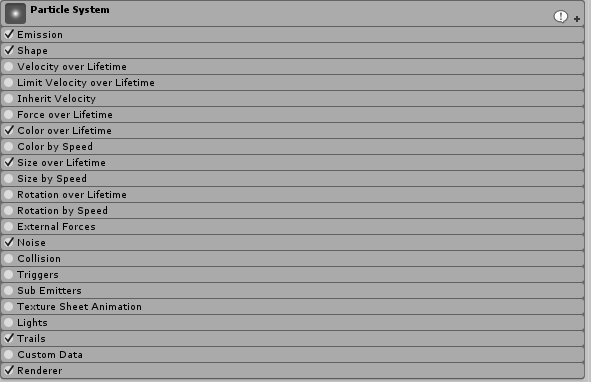
- Particle System
- That is the worldwide choices for the particle impact, we will set issues like looping, preliminary measurement, pre-warm and so forth.
- Emission
- That is used to outline how the particle pop into existence. Unexpectedly or sluggish trickle.
- Form
- The place the particle spawn from. Come out from a circle, spawn in a circle and so forth.
- Velocity over Lifetime
- Pace and route to go after spawning. Nice for emulating wind or smoke rising.
- Restrict Velocity Over Lifetime
- Used to decelerate particles as they grow old.
- Inherit Velocity
- Ought to the particle get its velocity from the guardian its hooked up to.
- Drive Over Lifetime
- Just like velocity over Lifetime besides this makes use of a drive so pace will enhance over time.
- Shade Over Lifetime
- Change the particle colour because it will get older. Can assign a gradient from white to clear so particle appear to be they fad out of existence.
- Shade by Pace
- Units the colour of the particle primarily based on its pace.
- Dimension over Lifetime
- Change the dimensions of the particle because it will get older. Small to Large, Large to Small or assign a customized curve.
- Dimension by Pace
- Change the dimensions primarily based on the pace.
- Rotation over Lifetime
- Rotates the particle over its life by x levels. works greatest with customized particle because the default is spherical.
- Rotation by Pace
- Rotates a particle primarily based on its pace.
- Exterior Forces
- Permits the particle to be affected by forces outlined by you (wind zones and so forth).
- Noise
- Modifications the particle primarily based on a noise algorithm like perlin or simplex.
- Collision
- Permits particle to collide with colliders.
- Triggers
- Permits interplay and callbacks when getting into set off colliders.
- Sub Emitters
- Can provoke one other particle impact.
- Texture Sheet Animation
- Lets you use an animation as a substitute of a static picture for a particle.
- Lights
- Permit particle to emit gentle to close by objects.
- Trails
- Make particle go away a path behind them.
- Customized Knowledge
- Lets you get data on the particle in a script.
- Renderer
- Right here you’ll be able to set how the particle is rendered to the person.
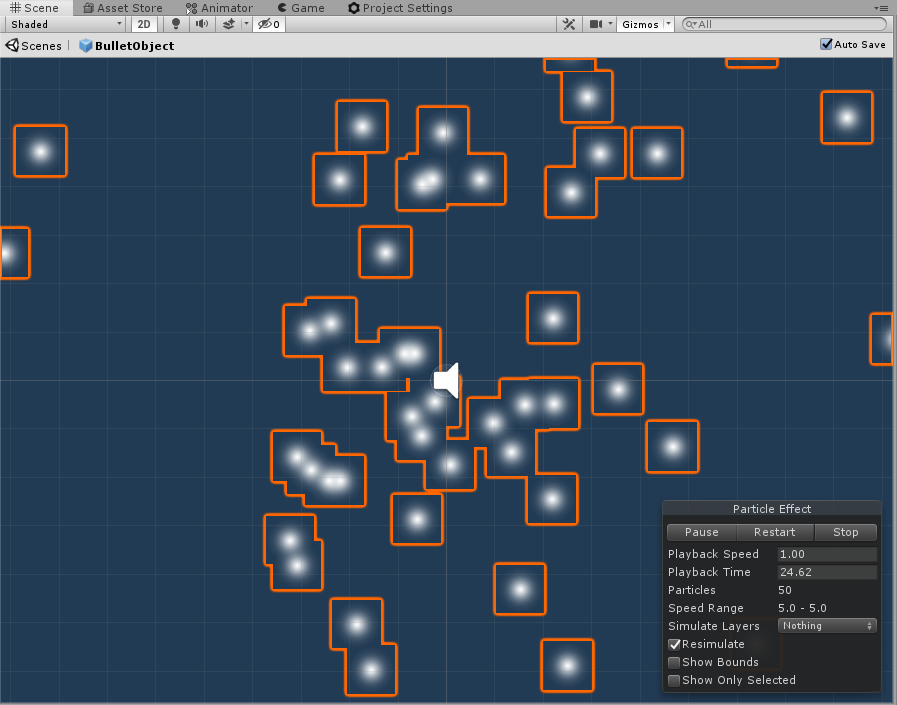
Full Unity 2D Recreation Tutorial 2019 – Particle Results Our Bullet Impact
For our Bullet we’ll use the Emission, Form, Shade over Lifetime, Dimension over Lifetime, Trails and Renderer. Under are the settings I’ve used Which you’ll be able to copy, or if you wish to try to make one thing cooler have a mess around and see what you provide you with.


If you happen to used my settings you need to come out with one thing like the next gif.

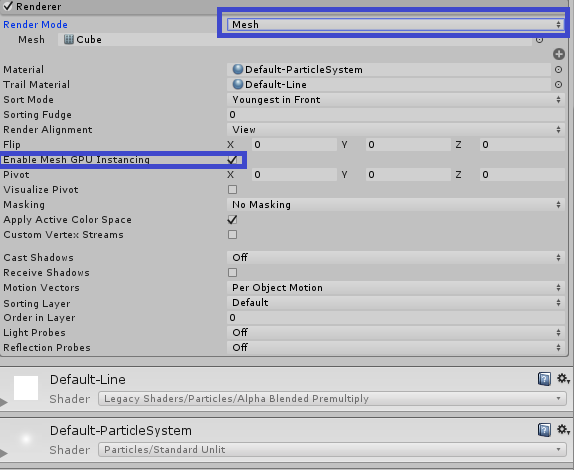
Full Unity 2D Recreation Tutorial 2019 – Particle Results GPU
To make use of the GPU to compute our particle we should first change the render methodology from Billboard to mesh. Then be certain the Allow Mesh GPU Instancing is checked. This may permit the GPU to work on the particles however might trigger points when engaged on platforms like net pages. So solely use this if you already know it’s supported on the platform you’ll use.
That’s it for this part of the tutorial. As ordinary the finished supply is on the market on Github right here.
Earlier Half – Subsequent Half (coming quickly)
Views: 17,712
